Legend
The once glorious Nightmare Knights have established themselves under the fiery pits of inferno to fight off evil. The pits of inferno however contains thrones that have a little of the spirit of each of the ruthless seven trapped in there. Absorb their spirit to claim your prize!
Location
Pits of Inferno, under the Plains of Havoc; entrance at the Necromant House.
Dangers
Spectre, Hand of Cursed Fate, Demon, Son of Verminor , Dark Torturer, Hellhound, Defiler, Betrayed Wraith, Phantasm, Destroyer, Lost Soul, Blightwalker, Plaguesmith, Nightmare, Juggernaut, Diabolic Imp, Fury, Hellfire Fighter, Undead Dragon, Banshee, Dragon Lord, and also possibly PoI bosses: Dracola, Mr. Punish, The Handmaiden, The Imperor, The Plasmother, Massacre, Countess Sorrow. Expect also weaker creatures along the way to the Pits of Inferno, such as Cyclopes and Giant Spiders.
Reward
Access to the Necromant House teleport leading to the portal room (immediately before thronerooms), access to the Pits of Inferno shortcut, 100 Platinum Coins, Soft Boots, Backpack of Holding (containing a Silver UH Rune, SD Rune, Explosion Rune and HMM Rune), Stuffed Dragon, Frozen Starlight, Ceremonial Ankh and choose between: Arcane Staff/Avenger/Arbalest.
(settings)
Required Equipment
- Shovel [or equivalent]
- Rope [or equivalent]
- Pick [or equivalent]
- Holy Tible
- Blood* [in any container]
- You need blood to pass Goshnar's grave to access the Pits of Inferno. On Optional PvP players can stack and go down together, but on Hardcore PvP or non-dove Open PvP each player must bring their own.
- Oil* [in any container]
- You need oil to lubricate the Lever to open a bridge and access the Pits of Inferno Dragon Lair. One person can bring oil but it is recommended others bring some in case the bridge closes.
- Key 3700
- You need this to open the final reward room. At least one person in the team must have the key!
- Destroy Field Rune*
- Fields spawn on top of the hole to enter the Pits of Inferno. Also, there are many levers you will need to pull and many Hellfire Fighters which can cover them with fire.
- One player of each Vocation.
- Each vocation is needed to open a vocation-specific flame after the Pits of Inferno Dragon Lair. They do not need to join for the rest of the quest.
Method
Getting the Key 3700 and the Holy Tible
To get Key 3700 take the south exit of Venore and walk south-west. By a small body water you will find a hole. Dig it and drop down to 2 Bonelords and 3 Ghouls. Open the chest to the north for Key 3700. You can find the hole here.
To get the Holy Tible, you must walk to a small mountain very close to the Knightwatch Tower, south of the Plains of Havoc temple. Inside the mountain will be a chest containing this book, which has the graphics of the old T-Book. You can find the chest here. Note that you need either the Levitate spell or 3 Parcels to go up the little mountain.
Necromant's House and Pits of Inferno Dragon Lair
Foreword: it is advised to bring many vials of blood in case you make a mistake and/or for other team members.
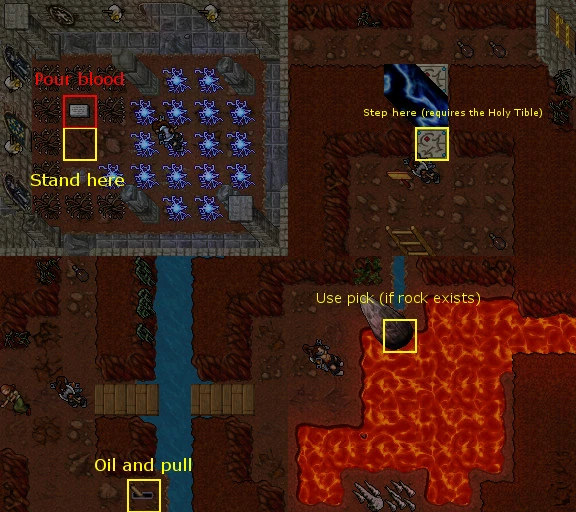
- Enter Goshnar's tomb by using blood on the gravestone while standing south of it.
- Pass the Shrine of Wonders by stepping on the carvings with the Holy Tible in your backpack.
- Enter the Pits of Inferno (level 30 expertise door to the east).
- Oil and pull the lever, and walk across the bridge.
- If there is lava in your path, destroy the stone with a Pick.
Go to the Plains of Havoc graveyard and dig a Loose Stone Pile (there are many leading to the same narrow cave). In the east part of the cave there's a 3x4 room. In this room, use a Pick on the north-west corner of the room (here). Go down the hole and 1 sqm south of Goshnar's gravestone (directly west of where you landed). Use the Blood on the gravestone and every player on that tile will be taken to the catacombs. To the south you'll find many Demon Skeletons and Ghosts but this is not part of the quest. Go north and step on the inscribed floor tile before a Magic Wall and it will take you to the other side (assuming you have a Holy Tible). Free Account players cannot pass this wall.
Optionally you can now go down the north hole to a small garden and the Well of Life, drinking from this will restore your health once and give you the achievement Fountain of Life.
To the east is a sign that says "To the Pits of Inferno". Go down this hole and south where you'll find a bridge which may be complete or broken. If it is open you can cross, if it is closed you must use Oil on the lever south of the bridge on the west side.
Note: if the bridge collapses while you are across, the only way back is by going through the PoI dragon lair! You can throw oil to the other side if your team needs it.
You will now see either a river of lava or a cool molten floor. If there's lava, you need to use a Pick on the stone near it to cool it. Once the lava is cooled you can cross to 3 holes, all leading to the PoI dragon lair. Prepare for many Dragon Lords and go down the northern hole (closest to the quest area). To the east is a rope hole that will lead you to a room filled with purple fires.
Hall of the Four Ways
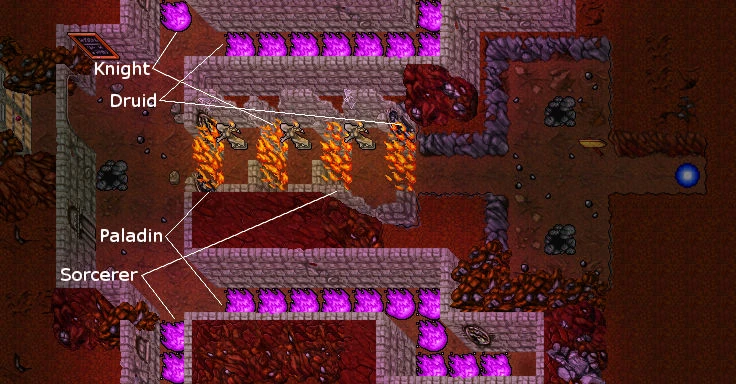
Paladins go south-east to open the first flame.
Knights go north to open the second flame.
Sorcerers go south to open the third flame.
Druids go north-east east to open the fourth flame.
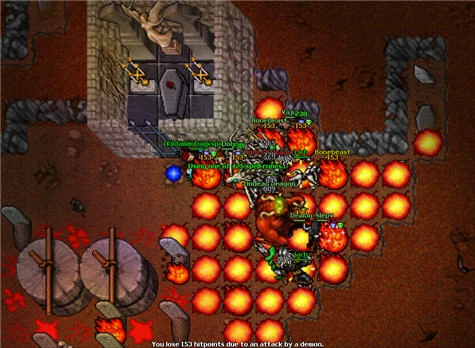
- Field 01: 300 fire damage + 12.5 physical damage = 312.5 total damage
- Field 02: 300 fire damage + 25 physical damage = 325 total damage
- Field 03: 300 fire damage + 50 physical damage = 350 total damage
- Field 04: 300 fire damage + 100 physical damage = 400 total damage
- Field 05: 300 fire damage + 200 physical damage = 500 total damage
- Field 06: 300 fire damage + 400 physical damage = 700 total damage
- Field 07: 300 fire damage + 800 physical damage = 1,100 total damage
- Field 08: 300 fire damage + 1,600 physical damage = 1,900 total damage
- Field 09: 300 fire damage + 3,200 physical damage = 3,500 total damage
- Field 10: 300 fire damage + 6,400 physical damage = 6,700 total damage
- Field 11: 300 fire damage + 12,800 physical damage = 13,100 total damage
- Field 11 without wearing a Stone Skin Amulet: 300 fire damage + 0 physical damage = 300 total damage
The physical damage can be reduced by wearing a Stone Skin Amulet; however, when walking on the very last tile, you should NOT wear a Stone Skin Amulet since this avoids taking any physical damage at all.
Each vocation needs to rope up a hole into a room with 3 Creatures:
- Paladins - 1 Spectre and 2 Nightmares
- Knights - 2 Diabolic Imps and 1 Spectre
- Sorcerers - 1 Spectre and 2 Nightmares
- Druids - 1 Spectre, 1 Diabolic Imp and 1 Nightmare
These monsters do not have to be killed, but you must pull a lever in the room at the end of the path. Dwarven Rings are highly recommended for all players.
Tip: Knights and paladins will have difficulty bringing down the spectre. It is recommended to run it.
Tip: Druids can SD the Diabolic Imp and then kill the Spectre.
Once all 4 levers have been pulled, the fire walls will have disappeared and the team can proceed through to the main area, also called "PoI levers". Make sure your entire team is through the walls before continuing as the fire walls will close once the stones disappear (in the next part).
Note: If your team needs to leave and the fire walls have closed, you can exit via the emergency exit on the east side of the flames. This will take you to the west side, you will have to exit via the dragon lair.
The Levers
The "PoI levers" area is located here and the 3 floors below. There are Spectres, Diabolic Imps, Defilers, Destroyers, Hellfire Fighters, Plaguesmiths and Lost Souls. There are 15 switches that must be pulled in the correct order to make the final switch work for a small period of time. This switch makes the 2 rocks near the entrance vanish and you gain access to a ladder.

Note: The rocks reappear after 15 minutes.
Note: There's an emergency exit after the rocks if your team needs to leave after you pass the rocks. Be warned, this teleport does not take you out of PoI: it takes you to the other side of the rocks. However, you can also take the shortcut by walking south of the 2 Blightwalkers, which is a safer exit.
Up the ladder you will find 2 Blightwalkers, 15 levers and a book with the following riddle:
look at the 4 and ignore the 2
end the 7 with 5 in mind
value of 6 is 9
explain the second of 4
run past the 7
substract 10
use the northeast first
see the colors change
errors are red
look what changes
expect no mercy
six times 10
stupidity is red.
All the levers are USELESS. Just read the first letter of all the lines.
The team must now split in two. Leave a team behind that can handle Defilers, Hellfire Fighters, Betrayed Wraiths and Blightwalkers. The other team must go ahead to the Pits of Inferno Spa.
To access the spa, have a person stand 1 sqm south of the rock in the center of the room (with the skeleton corpse on it). A player must go north and pull both levers, to access the hole to the spa.
In the spa you will fight Diabolic Imps, Nightmares, Defilers, Destroyers, Hellfire Fighters, Phantasms, Dark Torturers, Plaguesmiths, Blightwalkers and Fire Devils. Make your way to the east part of the spa (here) and search for a floor tile. When a person stands on this tile, a ladder appears in the room where you left the other part of the team. Have the team go up and clear the room, and then go back and stand on the tile where the ladder appeared, so they can rope you up.
The NPC Demonguard you will meet does not have a purpose. If you talk to him he will set you on fire.
Proceed by roping up again. The rope hole is 1 sqm north of the hole to go back down. You are now at the maze.
The Maze
Navigate the maze until you reach a dead end in the north-east part of it. Watch your step! The maze contains tiles which will teleport you all over the maze, including to the start! None of the tiles will take you outside of the maze, but some do take you 1 sqm from the hole back to the Demonguard, so don't be hasty. Once your entire team is at the end of the maze, use a Pick on the tile in the middle.
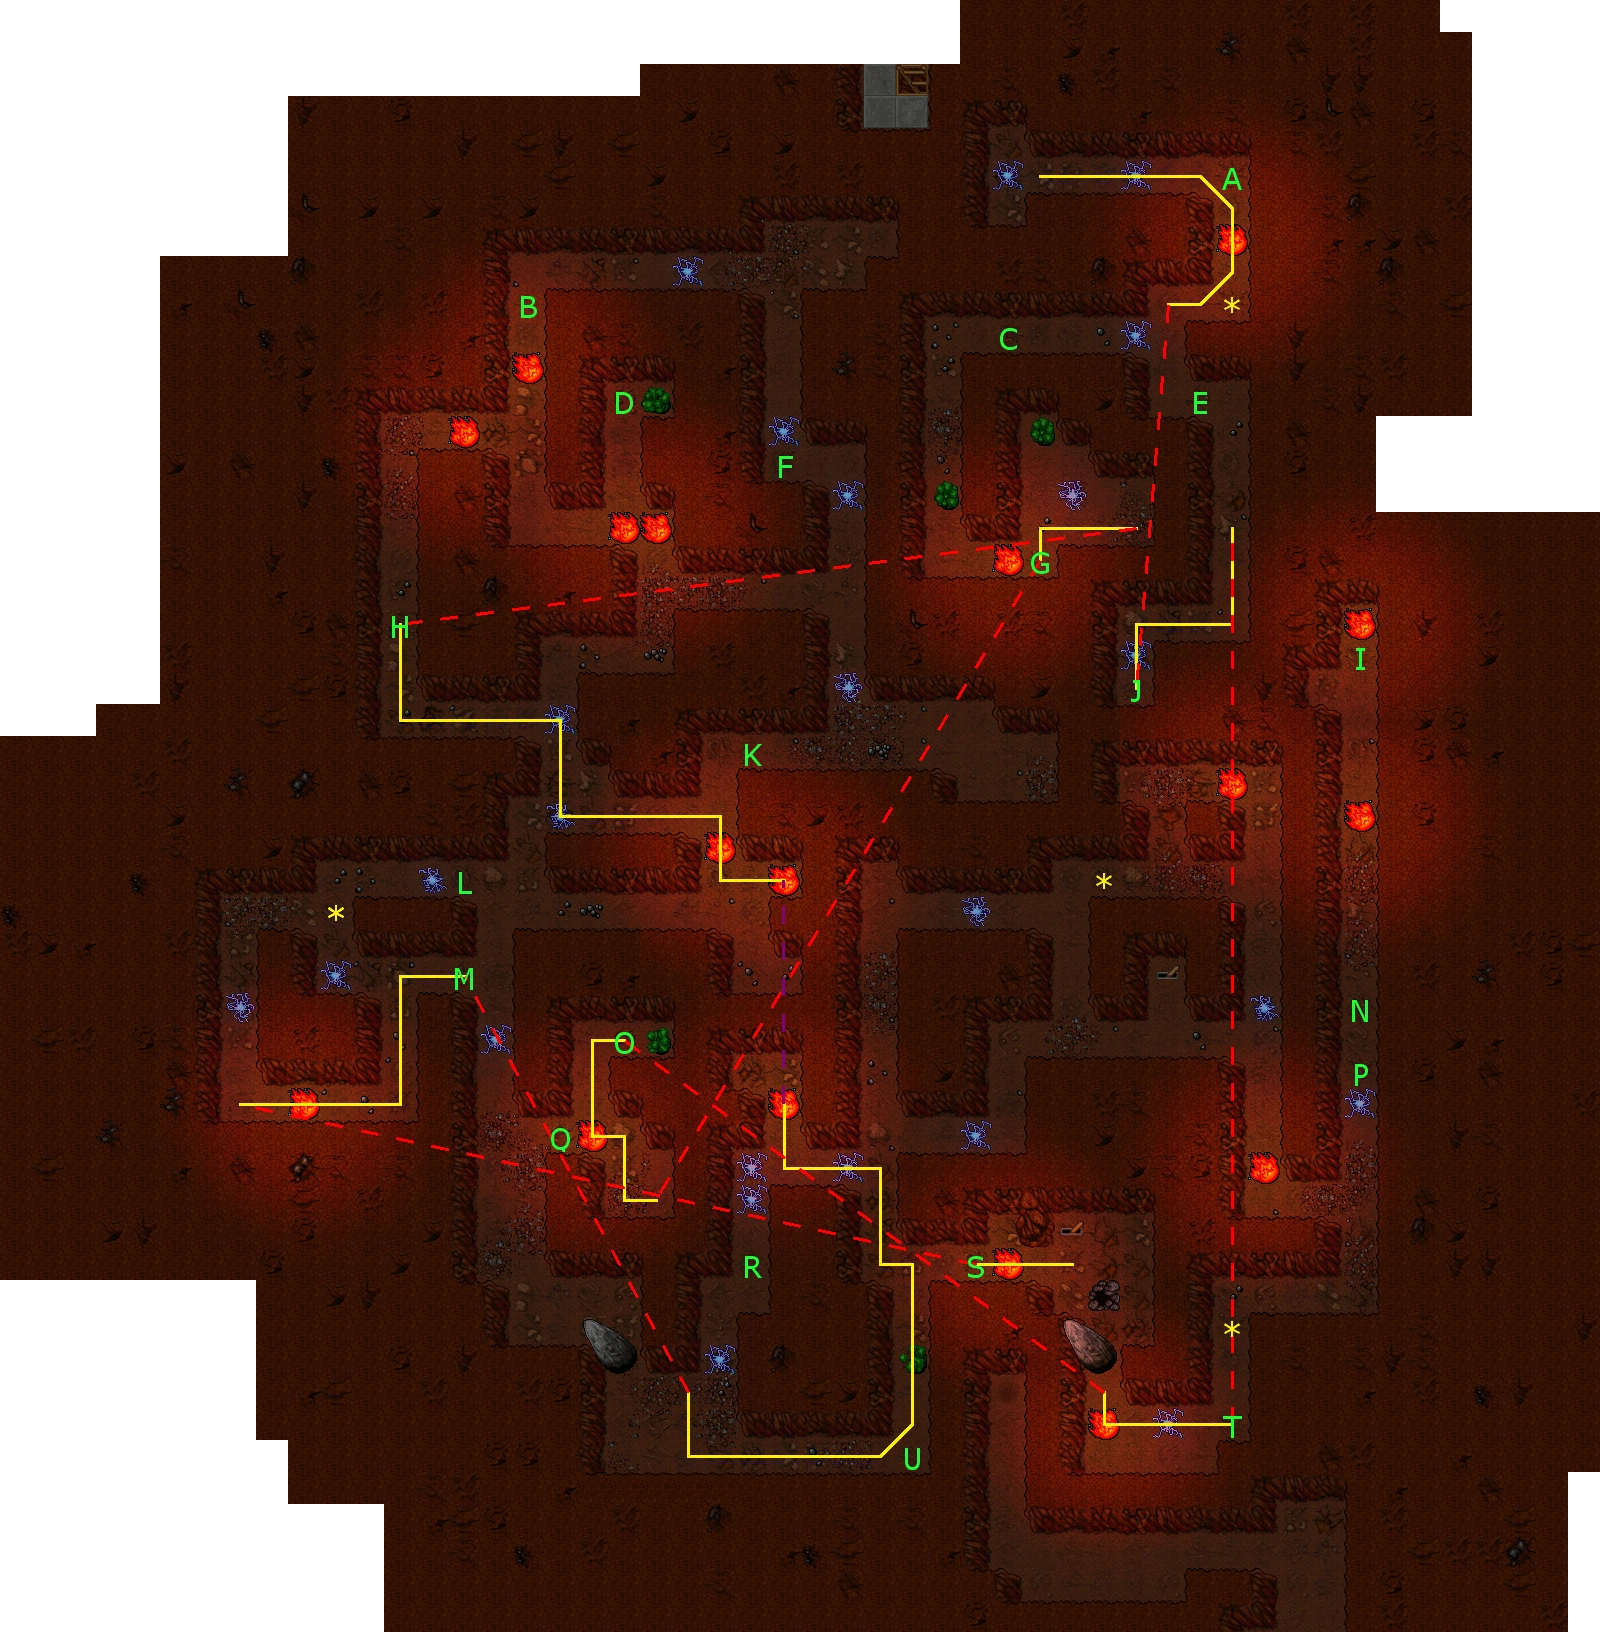
The maze is built of 10 distinct zones. At least 9 of these you must visit on the way, and each of them are only accessed via a teleport tile. Teleport 1 takes you to zone 2, teleport 2 takes you to zone 3, etc.. Ultimately, there is only one path that you can take although some tiles can send you to a previous zone. The following image shows the most efficient route to take. Teleport tiles are labelled in green. Yellow asterisks indicate they will take you back to the start of the maze. The red lines indicate the source and destination of the teleport tiles you are required to take, and a dead end line indicates a rope hole which has only one destination. When you rope the hole on line 'U', proceed to the northernmost hole to continue to the next area of the maze (purple dotted line).
Click here for a more detailed image of the maze.
Green letters: teleportation tiles.
Red dashed lines: teleport destinations.
Yellow lines: one correct route to take (dead end means you must rope).
Yellow asterisks (*): teleports to the start of the maze (in case you make a mistake - watch your step).
There are a few Hellfire Fighters and Magicthrowers which you must endure here. Have at least one player go to the east path and find the lever at the end (they may need Destroy Field Runes). Pull the lever to remove the rocks and have the team pass through. If the rocks return, the lever needs to be pulled again.
Tip: once the Hellfire Fighters have been killed, a mage can summon Demon Skeletons to absorb the Magicthrowers' attacks. To force the Magicthrowers to retarget to the DS, the team must go back up.
Note: your team should wait at the ladder when they go up! If they move, the rocks will return and the lever must be pulled again.
You are now at a short one-way path which leads to the PoI point of no return. Keep walking until you fall down a tile, and then rope up again. You cannot go back now. You will see two holes: the north will bring you to the PoH slime cave with no way back in, and the south will lead you to the depths of PoI, where the Ruthless Seven makes its move.
Go down the south hole and search the skeleton to receive the first installment of your reward: a Pirate Backpack with: a Ceremonial Ankh, a Death Ring, a Life Ring, 3 Orichalcum Pearls, 5 White Pearls, 2 Soul Orbs, 11 Platinum Coins, 2 Sudden Death Runes with 1 charge each, 3 Ultimate Healing Runes, Blank Rune and a Great Mana Potion.
Now make your choice. Head back with this loot, or go for the bigger prize and pass the level 80 door. Note that you cannot return via the exit, you must repeat all steps in the quest after the PoI levers (you may take the shortcut to skip to the PoI spa).
Main Room
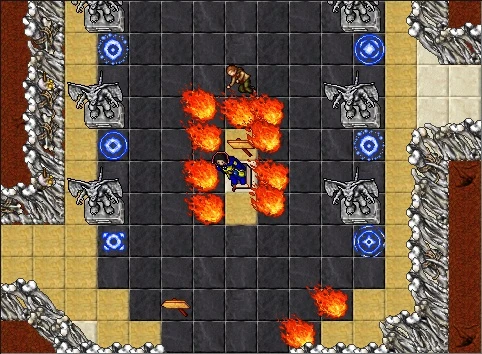
To continue with the quest go through the level 80 door and kill the creatures there. Go down the ladder and then head north. In this room there will be a teleporter into a room that looks the same, but has 2 Magicthrowers, some Hellfire Fighters and a switch on the floor that will set the whole room on fire. When you enter this second room a stone will be blocking the people behind you, you will have to flick the switch several times to make everyone pass. Once everyone is inside, continue north.
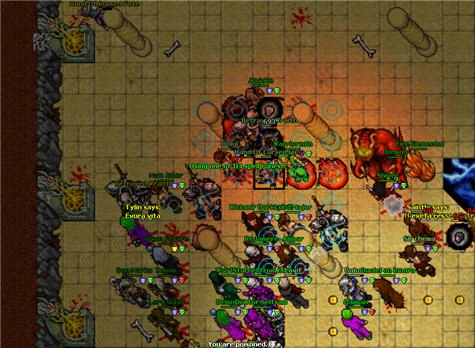
You will enter a room with some Phantasms, Betrayed Wraiths, Plaguesmiths, Blightwalkers and a Hand of Cursed Fate. This is the main room with 7 teleporters into the Ruthless Seven thronerooms and 7 electrical barriers to the north to deny you access to the reward room until you have the corresponding spirit of the Ruthless Seven.
The rest of the quest is a simple concept: clear the thronerooms and step on the thrones to absorb some of their spirit.
Note: Remember to check the Quest Log after you have stepped on a throne to be sure you have completed that throneroom. It is also recommended that you step on the throne twice. If you are pushed back and see the text 'Begone!' you know you have done that throne.
Note:(as of 1/15/23 the spawn can be blocked by standing on the white marble floor tile between the two sandstone tiles. Does not include the HFF's to the south) It is is no longer possible to leave one player behind to block the spawn in the main room, so during a quest service a part of the host team must be left in the room to keep it clear, or when hunting, you must keep in mind that after returning to the main room you will be faced again with the creatures.
Important note: Once you have entered (not completed) at least one of the thronerooms, you will be granted access to a teleport shortcut to the Main Hub located one floor above to ground in the Necromant House behind a sealed door. You now will have now a fast access to hunt here and to boss checks.
Sidenote, you have to absorb at least one of the thrones' essences to be able to access to the Demon Forge in the last mission of The Inquisition Quest.
The Throne of Plague (Verminor)

In this throneroom you will meet Defilers, Plaguesmiths, Sons of Verminor, Blightwalkers and possibly The Plasmother. Go south and follow the way to reach the throne, step on it twice to absorb some of Verminors spirit, then return to the teleporter.
Note: There are some invisible bridges (poison) near the throne, you will have to walk over them to reach the throne.
The Throne of Inferno (Infernatil)
In this throneroom you will meet Hellfire Fighters, Hellhounds, Demons and possibly The Imperor. often in large groups at the same time. Walk slowly here and try to lure them one at a time. Near the throne will be a switch hidden beneath fire, use destroy field to uncover it so you can get to the throne, step on it twice to absorb some of Infernatils spirit, then return to the teleporter.
The Throne of Damnation (Tafariel)
In this throneroom you will meet Banshees, Dark Torturers, Demons, Lost Souls and possibly Mr. Punish. Follow the path slowly to avoid too many creatures at once until you reach the throne, step on it twice to absorb some of Tafariels spirit, then return to the teleporter.

The Throne of Destruction (Apocalypse)
Enter the north teleport in the main room to appear in a wrecked ship. There will be Destroyers, Furies, Demons, Juggernauts and (rarely) Massacre. This throneroom is relatively small. Be careful as the Juggernauts come in groups. Step on the throne to absorb some of Apocalypse's spirit. It is recommended you do this twice to be sure.
The Throne of Despair (Pumin)
Enter the north-eastern portal to find a long hallway with 4 dead bureaucrat NPCs. To enter Pumin's domain you must gain permission from the bureaucrats. Use the following dialog. Each bureaucrat is numbered from 1 (furthest south) to 4 (furthest north).
GET STUCK? THERE IS A TIP: All NPCs here are dull, and there is a little chance they will simply ignore you, because they didn't understand you. So in some cases you have to talk with them multiple times. To be sure NPC correctly heard you, check Dialogs Transcription at the bottom of page. If NPC answer matches Dialog Transcription then you can move to next NPC.
- A Dead Bureaucrat 1: Hi / Pumin / your_name / your_vocation / Pumin (Response: ...Please go to my colleagues and ask for Form 356. You will need it in order to proceed.)
- A Dead Bureaucrat 4: Hi / Pumin / your_name / your_vocation / 356 (Response: ...Sorry, you need Form 145 to get Form 356. Come back when you have it.)
- A Dead Bureaucrat 3: Hi / Pumin / your_name / your_vocation / 145 (Response: That's right, you can get Form 145 from me. However, I need Form 411 first. Come back when you have it.)
- A Dead Bureaucrat 1: Hi / 411 / no (Response: ...I give you the permission to get Form 287. Bye!)
- A Dead Bureaucrat 2: Hi / 287 (Response: Sure, you can get it from me. Here you are. Bye)
- A Dead Bureaucrat 1: Hi / 411 / Yes (Response: Great. Here you are. Form 411. Come back anytime you want to talk. Bye.)
- A Dead Bureaucrat 3: Hi / 145 (Response: Well done! You have form 411!! Here is Form 145. Have fun with it.)
- A Dead Bureaucrat 4: Hi / 356 (Response: You are better than I thought! Congratulations, here you are: Form 356!)
- A Dead Bureaucrat 1: Hi / 356 (Response: INCREDIBLE, you did it!! Have fun at Pumin's Domain!)
When the team is all ready, go in the teleport north to enter Pumin's domain. There will be Spectres, Betrayed Wraiths, Demons, Hands of Cursed Fate and (rarely) The Handmaiden. Fight your way through the throneroom but be mindful of the invisible walls. Step on the throne to absorb some of Pumin's spirit. It is recommended you do this twice to be sure.
Tip: if you find yourself having problems with the invisible walls, you can 'use' a distant tile and the server will automatically find the quickest route to it (assuming there are no obstacles in the way).
Tip: the pillars support an invisible floor above there. You can levitate up near the start of the throneroom and walk freely to the throne, but that doesn't mean you can "skip" the throneroom - you will still have to kill most of the monsters.
Note: The NPC area of Pumin's domain is the only safe area until the reward room.
The Throne of Deceit (Bazir)
Note: Always, always check your minimap before going up rope holes. The maze has only 3 floors, if you are on the 3rd floor then any rope holes will take you out of the maze and into Pits of Inferno Dragon Lair, with no way to return to the maze.
Note: Do not under any circumstances use a Lever or Magic Forcefield as they may take you to the wrong places. When pulled, the levers become nonfunctional, so your teammates can't use the same lever to help you.
Note: If some of your team is sent back to the start of the maze, they can be roped up to the second last room of the maze (from the first room). There is no rope counterpart on the bottom, so someone must have reached the end to do this.
Note: If you need/want to view the maze on TibiaWiki's mapper, here is where you start.
In Bazir's domain you must traverse a maze with many traps. You will face Phantasms, Nightmares, Demons and "Demon" Goblins.
You can follow the images below (recommended) or the directions following them.
- Image route
- Follow the green lines. They will end on a hole or a rope spot - this indicates to go up/down at that tile.
- When the image line ends on a tile other than a rope spot or hole, you are at the end. Follow the spoiler below.
")
")
")
")
- Directions
- For ease of use, with each numbered step you will be in a different room. On step 5 you would have gone up or down 4 holes.
- (2-3 Phantasms, 2 Nightmares): from the portal, go west across the fire fields, south a few steps and then east. Half way east you will find either a rope hole, fire field or trash. Rope up.
- (2 Nightmares): rope up the hole on the north-east.
- (2 Demons, 3-4? Demons (Goblins)): Go south and west around the cave walls, then north. Drop down the hole.
- (2? Demons (Goblins)): Go south, drop down the hole (not up).
- (3-4? Phantasms, 3-5? Nightmares, Countess Sorrow (rare)): Go south all the way, a little west and then south again. Follow the path all the way east and then north. Go up the hole.
- (nothing): Go up the hole on the north side of the room.
- (2 Nightmares): go west and then north-east. Go down the hole (east side of the cave).
- (nothing?): go west and north a few squares. Drop down the hole.
- (2 Demons (Goblins)?): go west and rope up the hole.
- (nothing): go north around the hole and drop down the hole on the north side of the room.
- (nothing): go north, east a few squares, then north again. Rope up the rope hole (it may be hidden under a fire field).
- (2? Nightmares, 2-3? Demons (Goblins)): go north, east, and then south. Rope up the hole on the east side of the cave, probably hidden below fire fields.
- (3 Nightmares): you are now in the final room. Follow the spoiler below.
- After the maze
Now that you are at the final room, pull the lever on the south-east side of the room. The lever may be covered by an Orc corpse. A teleport will appear at the south-western hole. Enter the teleport to exit the maze.
- You are now in a room with some Platinum Coins. The coins are on a higher, unreachable floor. Walk to them and you will be teleported to another room.
- Go north and find a Magic Forcefield. The forcefield is on a higher floor, so levitate up or find the hidden ladder on the north-west side of the room you are in. Enter the portal.
- You are in a room with void all around it. Move toward the treasure chest at either the south or north side of the room. Before you can reach them, you will be teleported to the next room.
- You are now in a similarly structured room. Go to the western wall of the room and use the blue tapestry to move it. When moved, a mirror will be uncovered. Use the mirror to appear in the throneroom.
- Go to the north side in the middle. Step on his throne to absorb his spirit, and then again to appear at the previous room.
- You are now done. To exit to the main room (be careful if the room is not clear), step on the carpet with the north-west knight statue.
The Throne of Decay (Ashfalor)
When you go through the teleport, you'll find yourself in a graveyard. In this room you will meet Liches, Demons, undead Dragons and possibly Dracola guarding the throne. Walk south, but be careful not to make the Undead Dragons use their wave attacks on the entire team. Walk on to the throne and step on it twice to absorb some of Ashfalors spirit, then return to the teleporter.
The Reward
In the teleporter room go north through the 7 energy doors and enter the teleport, here there will be lots of traps which will hurt you a little, mind your hitpoints as you walk on. You will arrive at a locked door with an NPC A Ghostly Sage next to it. Ignore the NPC and open the door with Key 3700. Enter the teleport on the south to get in the room with the rewards, to the north of the teleport there's a room that looks like the dream machine with a sword in the center.
")
")
After being teleported into the treasure room, walk north and you will find five chests containing, Pair of Soft Boots, Stuffed Dragon, Frozen Starlight, 100 Platinum Coins, and a Backpack of Holding containing a Silver Rune Emblem (Ultimate Healing), Silver Rune Emblem (Sudden Death), Silver Rune Emblem (Explosion) and Silver Rune Emblem (Heavy Magic Missile).
To the west you will find three more chests, where you will have to choose one of the following:
Get your rewards, and choose wisely! Now walk your back in the realm of the Ruthless Seven, and follow the signs that tell you where the exit is. Another option its ask a teleport to the NPC A Ghostly Sage located just before the rewards room. You will be able to leave through the Slime cave in the Plains of Havoc.
Dialogs transcription
Note: Some dialogs may be different may be depending on your vocation and gender.
Dialog with the 1st bureaucrat
|
Player: hi |
|||
Dialog with the 4th bureaucrat
|
Player: hi |
|||
Dialog with the 3rd bureaucrat
|
Player: hi |
|||
Dialog with the 1st bureaucrat
|
Player: hi |
|||
Dialog with the 2nd bureaucrat
|
Player: hi |
|||
Dialog with the 1st bureaucrat
|
Player: hi |
|||
Dialog with the 3rd bureaucrat
|
Player: hi |
|||
Dialog with the 4th bureaucrat
|
Player: hi |
|||
Dialog with the 1st bureaucrat
|
Player: hi |
|||